
How Do You Prepare Site Ground for Cold Storage Pods? IcefoxEquipment Installation Guide
Article Plans
Preparing the ground for a cold storage pod means creating a level, stable, load-bearing, well-drained installation area with safe delivery access, verified utilities, and an approved anchoring method. IcefoxEquipment supplies outdoor refrigeration pods, trailers, containers, and modular cold-storage structures for temporary, semi-permanent, and long-term projects across the United States. The company offers 24/7 support for deployment planning.
Poor ground preparation can affect much more than appearance. A small settlement beneath 1 corner can change door alignment, drainage, refrigeration performance, ramp position, utility connections, and the structural load path beneath the pod.
Quick Answer: Prepare cold-storage pod ground by confirming the unit’s exact 7×12, 7×20, 7×26, 8×20, or 8×40-foot footprint, evaluating soil and drainage, grading a level load-bearing pad, planning anchoring, protecting utilities, and preserving delivery access. Final foundation design should be approved for the selected unit and local site conditions.
Quick Facts
- Cold-storage pod foundations must be stable, level, load-bearing, and well drained.
- Foundation design should account for 4 factors: slope, soil stability, weather exposure, and unit size.
- Outdoor cold-storage equipment may range from 7×12 feet to 8×40 feet.
- Refrigeration power may require 220V, single phase, and 40–60 amps.
- A 50-foot, 6-AWG cable may be required when a rental cord is not included.
- IcefoxEquipment offers planning and emergency assistance 24 hours a day, 7 days a week.
Key Takeaways
- Do not order site work from a generic pod description; use the delivered unit’s exact length, width, weight, support points, and utility plan.
- Keep the pad level and well drained because even 1 settled corner can affect doors, ramps, condensate flow, and refrigeration connections.
- Separate vehicle access, pedestrian access, refrigeration service space, and electrical routing into at least 4 clear zones.
- Confirm whether the installation will use an engineered foundation, anchors, or a free-weight system before delivery.
- Match the selected pod to the available 220V, 40–60-amp electrical supply before ground work is completed.
What Ground Conditions Does a Cold Storage Pod Need?
A cold-storage pod needs firm, level, load-bearing ground that will not shift excessively under the unit’s concentrated support loads. IcefoxEquipment states that semi-permanent COOLBOX STRUCTURES™ Pods depend on a stable foundation designed for the site’s actual soil, slope, drainage, weather exposure, and unit size.
The site must support both the empty structure and its operating load. A 40-foot refrigerated container carrying approximately 20–24 pallets places a different demand on the ground than a 12-foot unit holding about 3–5 pallets.
In our experience, the wrong approach is to ask only, “Can a truck drive across this ground?” Truck access and long-term pod support are 2 different questions. Soil that survives one delivery may still settle after rain, freeze-thaw cycles, repeated loading, or months of concentrated weight.
The surface also needs positive drainage. Water should move away from the pod, electrical connection, stairs, ramps, loading threshold, and refrigeration components rather than pooling beneath 1 side.
How Do You Determine the Required Pad Size?
Start with the exact equipment drawing, not the nominal pod name. A unit described as 20 feet long may still require additional space for refrigeration machinery, doors, electrical panels, ramps, bollards, maintenance access, and delivery equipment.
IcefoxEquipment outdoor configurations may include 7×12, 7×20, 7×26, 8×20, and 8×40-foot structures. The prepared area must accommodate the selected footprint plus all required operating clearances.
Mark at least 4 site zones before excavation or grading:
- The pod’s structural footprint.
- The refrigeration and electrical service area.
- The product-loading and pedestrian-access area.
- The truck, crane, forklift, or placement-equipment route.
Do not pour a pad based only on exterior length and width. In our opinion, undersizing the service side is one of the easiest ways to turn an otherwise good foundation into an expensive operating problem.
A full site drawing should show the pod orientation, door swing, refrigeration location, electrical connection, cable route, loading path, ramp or stair position, nearby buildings, drainage direction, and at least 1 emergency-access route.
What Type of Foundation Should You Use?
The correct foundation depends on the pod design, rental duration, soil capacity, frost conditions, local codes, anchoring requirements, and whether the structure will be relocated. IcefoxEquipment describes COOLBOX STRUCTURES™ Modular Edition units as capable of being anchored or tied down to a foundation or free-weight system for temporary, semi-permanent, or permanent use.
A short-term installation may use a different engineered support approach than a project lasting 6, 12, or 24 months. Long-term projects give soil settlement, erosion, seasonal movement, and repeated loading more time to affect the structure.
The source materials do not establish one universal foundation specification for every pod. The correct design must come from the delivered unit’s support layout, project engineer, manufacturer requirements, local authority, and site-specific ground information.
Avoid improvised support made from scattered scrap lumber or unrelated materials. Every support point should transfer the load into a foundation or bearing system designed to keep the pod level during the full rental period.
If a free-weight system is used, confirm how it will resist movement without blocking refrigeration service, drainage, doors, ramps, or utility connections. The anchoring plan should be established before the 1st delivery vehicle enters the site.
How Level Must the Ground Be?
The prepared surface must hold the pod level enough to preserve its designed structural alignment, door operation, drainage, and equipment performance. The source documents do not provide a single allowable slope for every IcefoxEquipment pod, so the project team should follow the exact unit drawing and approved installation plan.
Leveling is not just a delivery-day task. The site should remain stable during rain, snow, freeze-thaw movement, inventory loading, and the complete 24-hour refrigeration cycle.
Check more than the center of the pad. Verify the elevation at every structural support point and around all 4 corners before placement begins.
After installation, recheck door alignment, threshold height, ramp connection, condensate flow, and visible settlement. If the door begins rubbing after 1 heavy storm, treat that change as a possible foundation issue rather than merely adjusting the latch.
How Should the Site Handle Rain and Drainage?
The ground should direct surface water away from the pod and keep the support area from softening or eroding. A stable foundation can still perform poorly when runoff repeatedly washes soil away from 1 edge.
Do not place a pod at the lowest point of the property without a reviewed drainage plan. Water collecting around electrical service, cables, stairs, ramps, or refrigeration equipment can interrupt access and create maintenance hazards.
Plan where condensate and defrost water will discharge. The outlet should not create standing water beneath the unit, cross a pedestrian route, or undermine the prepared pad during each 24-hour operating period.
Keep nearby roof drains and downspouts in the site plan. A single 1 downspout aimed toward the foundation can deliver repeated concentrated runoff even when the rest of the property appears dry.
For winter projects, drainage becomes a traction issue as well as a foundation issue. Water that crosses the access path can freeze at 32°F, affecting workers moving carts or products between the building and pod.
What Delivery Access Must Be Prepared?
The delivery route must support the transport vehicle and any forklift, crane, jack, or placement equipment needed for the selected pod. IcefoxEquipment’s deployment guidance emphasizes access planning, ground preparation, utility verification, workflow, and security before equipment arrives.
Measure gates, turns, overhead obstructions, tree limbs, utility lines, slopes, parked vehicles, curbs, and soft shoulders before the 1st scheduled delivery.
The final approach should be firm enough for the delivery vehicle to maneuver without sinking or losing traction. A finished pad is not useful when the truck cannot reach it.
Protect recently installed underground utilities. Mark every known water, sewer, gas, electrical, communications, and drainage line before heavy equipment crosses the site.
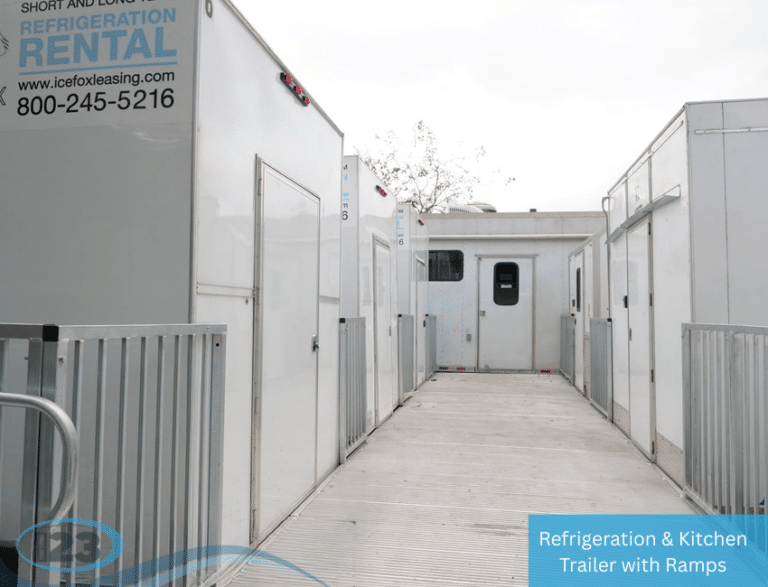
If ramps are required, the uploaded ramp guide states that installation may need a forklift, leveling blocks, and jack stands. Those 3 items require additional stable working space beside the pod.
By the Numbers: Site-Preparation Planning
| Site-planning item | Sourced figure |
|---|---|
| Example compact unit | 7×12 feet |
| Example intermediate unit | 7×20 or 7×26 feet |
| Example large unit | 8×40 feet |
| Smaller trailer capacity | Approximately 3–5 pallets |
| Large container capacity | Approximately 20–24 pallets |
| Typical trailer power | 220V, single phase |
| Electrical demand | 40–60 amps |
| Extension cable specification | 50 feet, 6 AWG |
These 8 figures are planning references, not substitutes for the delivered equipment drawing. The exact pod weight, bearing points, refrigeration location, connector, door arrangement, and placement method must be confirmed before grading begins.
How Do You Prepare Utilities Before Pod Placement?
Utilities should be planned at the same time as the foundation. Refrigeration trailers in the uploaded setup guide require 220V, single-phase, 40–60-amp service, while another equipment guide lists 220V and 40 amps for certain 12-foot freezer and 20-foot refrigerated trailers.
The exact delivered unit controls. Do not build the electrical pedestal around a generic 40-amp assumption when the selected equipment may require 50–60 amps.
If IcefoxEquipment does not supply a rental cord, the installation guide specifies a 50-foot, 6-AWG extension cord and a licensed commercial electrician at the site.
Route electrical service where it will not cross standing water, loading lanes, forklift paths, sharp curbs, or the pod’s support points. Protect at least 1 clear route for technicians to reach the disconnect and refrigeration controls.
For long-term installations, consider how utility work will be inspected and protected after 6, 12, or 24 months of weather and site activity.
What Does Ground Preparation Cost?
Ground-preparation cost is site specific and is separate from the basic equipment rate. The pricing guide states that rental figures may vary with location, freight, site conditions, utilities, emergency mobilization, seasonal demand, and rental duration.
A 12-foot refrigerated trailer is listed at $1,295–$2,195, while a 20-foot refrigerated or freezer trailer is listed at $1,495–$2,395.
Ground-level refrigerated containers are listed at $2,495–$2,995 for a 20-foot unit and $2,995–$3,995 for a 40-foot unit.
Those rates generally do not include every project expense. Potential additions include delivery, installation, electrical connections, foundation work, permits, anchoring, stairs, ramps, generators, fuel, drainage, fencing, bollards, and site restoration.
Ramp costs can be substantial. The uploaded ramp document lists a 3-month minimum, pricing beginning at $9,995, setup from $4,995–$6,995, and teardown from $3,995–$5,995.
Our practical advice is to compare the complete installed cost, not only the lowest equipment rate. Saving 1 line item on grading can create larger costs through settlement, blocked delivery, unsafe access, or reinstallation.
How Does IcefoxEquipment Plan a Cold Storage Pod Site?
Use the following 7-step process before scheduling delivery:
- Choose the unit. Confirm whether the project requires a 7×12, 7×20, 7×26, 8×20, or 8×40-foot configuration.
- Obtain the drawing. Identify the exact footprint, support points, doors, refrigeration equipment, and utility connections.
- Evaluate the ground. Review slope, soil stability, drainage, weather exposure, and unit size as 5 separate conditions.
- Design the support system. Select the approved foundation, anchoring, tie-down, or free-weight method.
- Prepare delivery access. Verify gate width, turning space, overhead clearance, soil strength, and unloading location.
- Install utilities. Confirm 220V, phase, amperage, disconnect location, cable route, and electrician availability.
- Inspect before placement. Check elevations, drainage, access, anchors, and utility protection before the 1st truck arrives.
To request a site review, contact IcefoxEquipment cold-storage specialists and provide the project ZIP code, rental duration, required temperature, proposed size, site photographs, utility information, and access measurements.
What Common Site-Preparation Mistakes Should You Avoid?
Mistake 1: Preparing Only the Pod Footprint
An 8×40-foot box needs more than an 8×40-foot work area. Refrigeration, electrical service, loading, maintenance, and placement equipment require additional space.
Mistake 2: Ignoring Soft Soil After Rain
Ground that appears firm during 1 dry inspection may soften after repeated rainfall. Review drainage and soil stability before delivery.
Mistake 3: Completing Electrical Work After Placement
A 50-foot, 6-AWG cable cannot solve every routing problem. Plan the disconnect, cable protection, and electrician’s access before the unit blocks the work area.
Mistake 4: Using Random Blocks for Permanent Leveling
Improvised blocks may shift under the concentrated weight of 20–24 pallets plus the refrigerated structure. Use the approved support arrangement.
Mistake 5: Forgetting Ramp Installation Space
Ramp setup may require a forklift, leveling blocks, and jack stands, creating at least 3 additional equipment and workspace needs.
Cold Storage Pod Site Checklist
- ☐ Confirm the exact length and width of the selected pod.
- ☐ Obtain the support-point and anchoring drawing before grading.
- ☐ Evaluate 4 primary conditions: slope, soil, weather, and unit size.
- ☐ Grade a stable, level, load-bearing area.
- ☐ Direct rainwater and condensate away from the foundation.
- ☐ Protect delivery access for the pod and placement equipment.
- ☐ Locate underground utilities before heavy vehicles arrive.
- ☐ Verify 220V, single-phase, 40–60-amp service where applicable.
- ☐ Plan any 50-foot, 6-AWG cable route.
- ☐ Reserve space for doors, refrigeration service, carts, stairs, and ramps.
- ☐ Confirm the approved anchoring or free-weight system.
- ☐ Call 800-245-5216 before finalizing the site layout.
Request a Quote
Request a quote today for industry-leading refrigeration, modular facilities, and mobile equipment solutions. Ice Fox Equipment provides rapid deployment, flexible rental and leasing options, and dependable support for construction, healthcare, food service, emergency response, and industrial operations. Contact our team now for a customized, no-obligation quote.

Frequently Asked Questions
No single foundation type applies to every project. IcefoxEquipment pod placement depends on the unit design, support points, soil, slope, drainage, weather, duration, anchoring method, and local requirements. A project lasting 6, 12, or 24 months may need a different engineered solution than a short emergency deployment.
Prepare more than the nominal 7×12, 7×20, 7×26, 8×20, or 8×40-foot footprint. The site must also accommodate refrigeration equipment, electrical service, door movement, carts, technician access, delivery vehicles, drainage, anchoring, and any stair or ramp system required for operation.
The exact requirement depends on the delivered equipment. Uploaded setup documents list 220V, single-phase service at 40–60 amps, while another guide lists 220V and 40 amps for certain smaller trailers. When no rental cable is included, a 50-foot, 6-AWG cord may be required.